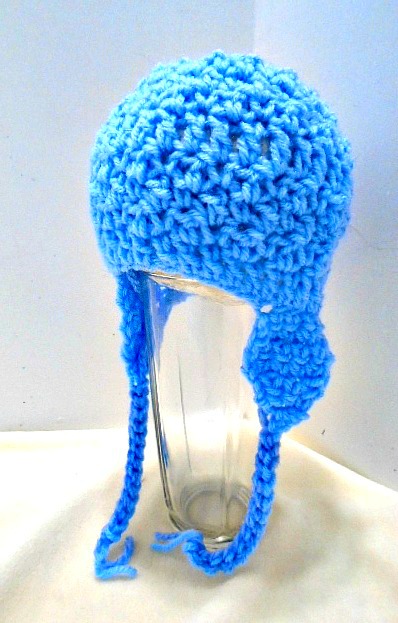
2057YT- FREE, Headband, Beanie, Ear Flap Hat
Lean how to make 3 garments from one pattern
 Copyright © 2017, Emi Harrington (Do not give away or sell this pattern, copyright protected.)
This pattern may be printed for your personal use only. You may not in any form, reproduce, transmit, give away or distribute this pattern, including but not limited to images, diagrams and text, through any venue, including photocopying, other electrical or mechanical means, recording, or any other information storage and or retrieval system. (Copyright infringement, even without monetary gain, is punishable by up to five years in federal prison and a fine of $250,000.)
Permission is granted to sell your finished garments.
LEARN TO CROCHET HERE:
MY FREE VIDEO TUTORIALS ON YOUTUBE:
You can find me here:
MATERIALS:
Worsted weight yarn
6 mm crochet hook
Yarn needle
This pattern is available on Ravelry as a downloadable PDF for $1.00.
Click here for the listing: http://www.ravelry.com/patterns/library/2057yt---pebble-hat
Please sign up with your email address on the right, (scroll up) ---> to receive an email when I upload a new post.
NEWBORN - 3 MONTHS:
1. Chain 32, slip stitch to join being careful not to twist the chain.
2. Chain 2, double crochet in each stitch around, slip stitch to join.
3. Chain 1 and turn, single crochet in the same stitch, *double crochet in the next stitch, single crochet in the
next stitch, repeat from * around, slip stitch to join, ending with a double crochet, slip stitch to join in the first
single crochet stitch.
4. Chain 2 and turn, single crochet in the next stitch, double crochet in the next stitch, repeat from * around, ending
with a single crochet, slip stitch to join in the top of the first chain 2.
5. Repeat step 3 and 4.
6. Chain 2 and turn, double crochet in each stitch around, slip stitch to join.
If making a headband, fasten off, weave yarn ends into the finished work.
 7. Repeat step 3 and 4 until the work measures 4 inches.
Then work in a spiral: *single crochet in the next 3 stitches, skip the next
stitch, repeat from * until the top of the hat
Is almost closed. Fasten off, thread the yarn end into a needle, weave
through the last row of stitches, pull to close
the top of the hat. Weave all yarn ends into the finished work.
Fold the hat so the yarn end from the foundation chain is the back of the hat.
Count 4 stitches toward the front, attach yarn in the next stitch, single crochet in the same stitch, and in the next 6 stitches toward the front of the hat.
*Chain 1 and turn, single crochet in each stitch across the 7 stitches, repeat from * for 2 more rows.
Decrease for the end of the ear flap:
*Chain 1 and turn, skip the first stitch, single crochet across the row, skipping the 2nd to last stitch, single crochet in the last stitch. repeat from * until there is only one stitch remaining. Add another strand of yarn, and crochet the tie, with as many stitches as desired. Fasten off.
Make the opposite ear flap: Attach yarn in the matching stitch on the opposite side of the hat, and follow the above instructions to work the opposite ear flap. Weave all yarn ends into the finished work.
END OF PATTERN FOR NEWBORN TO 3 MONTHS.
##############################################################
#############################################################
3 to 6 MONTHS FREE, Headband, Beanie, Ear Flap Hat - COPYRIGHT: Emi Harrington
1. Chain 38, slip stitch to join being careful not to twist the chain.
2. Chain 2, double crochet in each stitch around, slip stitch to join.
3. Chain 1 and turn, single crochet in the same stitch, *double crochet in the next stitch, single crochet in the
next stitch, repeat from * around, slip stitch to join, ending with a double crochet, slip stitch to join in the first
single crochet stitch.
 4. Chain 2 and turn, single crochet in the next stitch, double crochet in the next
stitch, repeat from * around, ending
with a single crochet, slip stitch to join in the top of the first chain 2.
5. Repeat step 3 and 4.
6. Chain 2 and turn, double crochet in each stitch around, slip stitch to join.
If making a headband, fasten off, weave yarn ends into the finished work.
 7. Repeat step 3 and 4 until the work measures 4.5 inches.
Then work in a spiral: *single crochet in the next 3 stitches, skip the next
stitch, repeat from * until the top of the hat
Is almost closed. Fasten off, thread the yarn end into a needle, weave
through the last row of stitches, pull to close
the top of the hat. Weave all yarn ends into the finished work.
Fold the hat so the yarn end from the foundation chain is the back of the hat.
Count 5 stitches toward the front, attach yarn in the next stitch, single crochet in the same stitch, and in the next 7 stitches toward the front of the hat.
*Chain 1 and turn, single crochet in each stitch across the 8 stitches, repeat from * for 3 more rows.
Decrease for the end of the ear flap:
*Chain 1 and turn, skip the first stitch, single crochet across the row, skipping the 2nd to last stitch, single crochet in the last stitch. repeat from * until there is only one stitch remaining. Add another strand of yarn, and crochet the tie, with as many stitches as desired. Fasten off.
Make the opposite ear flap: Attach yarn in the matching stitch on the opposite side of the hat, and follow the above instructions to work the opposite ear flap. Weave all yarn ends into the finished work.
END OF PATTERN FOR 3 - 6 MONTHS.
##########################################################################################
6 - 12 MONTHS FREE, Headband, Beanie, Ear Flap Hat - COPYRIGHT: Emi Harrington
1. Chain 42, slip stitch to join being careful not to twist the chain.
2. Chain 2, double crochet in each stitch around, slip stitch to join.
3. Chain 1 and turn, single crochet in the same stitch, *double crochet in the next stitch, single crochet in the
next stitch, repeat from * around, slip stitch to join, ending with a double crochet, slip stitch to join in the first
single crochet stitch.
4. Chain 2 and turn, single crochet in the next stitch, double crochet in the next stitch, repeat from * around, ending
with a single crochet, slip stitch to join in the top of the first chain 2.
 5. Repeat step 3 and 4.
6. Chain 2 and turn, double crochet in each stitch around, slip stitch to join.
If making a headband, fasten off, weave yarn ends into the finished work.
7. Repeat step 3 and 4 until the work measures 4.75 inches.
Then work in a spiral: *single crochet in the next 3 stitches, skip the next
stitch, repeat from * until the top of the hat
Is almost closed. Fasten off, thread the yarn end into a needle, weave
through the last row of stitches, pull to close
the top of the hat. Weave all yarn ends into the finished work.
Fold the hat so the yarn end from the foundation chain is the back of the hat.
Count 5 stitches toward the front, attach yarn in the next stitch, single crochet in the same stitch, and in the next 8 stitches toward the front of the hat.
*Chain 1 and turn, single crochet in each stitch across the 9 stitches, repeat from * for 4 more rows.
Decrease for the end of the ear flap:
*Chain 1 and turn, skip the first stitch, single crochet across the row, skipping the 2nd to last stitch, single crochet in the last stitch. repeat from * until there is only one stitch remaining. Add another strand of yarn, and crochet the tie, with as many stitches as desired. Fasten off.
Make the opposite ear flap: Attach yarn in the matching stitch on the opposite side of the hat, and follow the above instructions to work the opposite ear flap. Weave all yarn ends into the finished work.
END OF PATTERN FOR 6 - 12 MONTHS
############################################################################################
1 - 3 YEARS FREE, Headband, Beanie, Ear Flap Hat - COPYRIGHT: Emi Harrington
1. Chain 46, slip stitch to join being careful not to twist the chain.
2. Chain 2, double crochet in each stitch around, slip stitch to join.
3. Chain 1 and turn, single crochet in the same stitch, *double crochet in the next stitch, single crochet in the
next stitch, repeat from * around, slip stitch to join, ending with a double crochet, slip stitch to join in the first
single crochet stitch.
4. Chain 2 and turn, single crochet in the next stitch, double crochet in the next stitch, repeat from * around, ending
with a single crochet, slip stitch to join in the top of the first chain 2.
5. Repeat step 3 and 4.
 6. Chain 2 and turn, double crochet in each stitch around, slip stitch to join.
If making a headband, fasten off, weave yarn ends into the finished work.
7. Repeat step 3 and 4 until the work measures 5 inches.
Then work in a spiral: *single crochet in the next 3 stitches, skip the next
stitch, repeat from * until the top of the hat
Is almost closed. Fasten off, thread the yarn end into a needle, weave
through the last row of stitches, pull to close
the top of the hat. Weave all yarn ends into the finished work.
Fold the hat so the yarn end from the foundation chain is the back of the hat.
Count 6 stitches toward the front, attach yarn in the next stitch, single crochet in the same stitch, and in the next 9 stitches toward the front of the hat.
*Chain 1 and turn, single crochet in each stitch across the 10 stitches, repeat from * for 5 more rows.
Decrease for the end of the ear flap:
*Chain 1 and turn, skip the first stitch, single crochet across the row, skipping the 2nd to last stitch, single crochet in the last stitch. repeat from * until there is only one stitch remaining. Add another strand of yarn, and crochet the tie, with as many stitches as desired. Fasten off.
Make the opposite ear flap: Attach yarn in the matching stitch on the opposite side of the hat, and follow the above instructions to work the opposite ear flap. Weave all yarn ends into the finished work.
END OF PATTERN FOR 1 - 3 YEARS
##########################################################################################################################
3 - 5 YEARS: FREE, Headband, Beanie, Ear Flap Hat - COPYRIGHT: Emi Harrington
1. Chain 50, slip stitch to join being careful not to twist the chain.
2. Chain 2, double crochet in each stitch around, slip stitch to join.
3. Chain 1 and turn, single crochet in the same stitch, *double crochet in the next stitch, single crochet in the
next stitch, repeat from * around, slip stitch to join, ending with a double crochet, slip stitch to join in the first
single crochet stitch.
4. Chain 2 and turn, single crochet in the next stitch, double crochet in the next stitch, repeat from * around, ending
with a single crochet, slip stitch to join in the top of the first chain 2.
5. Repeat step 3 and 4.
 6. Chain 2 and turn, double crochet in each stitch around, slip stitch to join.
If making a headband, fasten off, weave yarn ends into the finished work.
7. Repeat step 3 and 4 until the work measures 5.5 inches.
Then work in a spiral: *single crochet in the next 3 stitches, skip the next
stitch, repeat from * until the top of the hat
Is almost closed. Fasten off, thread the yarn end into a needle, weave
through the last row of stitches, pull to close
the top of the hat. Weave all yarn ends into the finished work.
Fold the hat so the yarn end from the foundation chain is the back of the hat.
Count 6 stitches toward the front, attach yarn in the next stitch, single crochet in the same stitch, and in the next 10 stitches toward the front of the hat.
*Chain 1 and turn, single crochet in each stitch across the 11 stitches, repeat from * for 5 more rows.
Decrease for the end of the ear flap:
*Chain 1 and turn, skip the first stitch, single crochet across the row, skipping the 2nd to last stitch, single crochet in the last stitch. repeat from * until there is only one stitch remaining. Add another strand of yarn, and crochet the tie, with as many stitches as desired. Fasten off.
Make the opposite ear flap: Attach yarn in the matching stitch on the opposite side of the hat, and follow the above instructions to work the opposite ear flap. Weave all yarn ends into the finished work.
END OF PATTERN FOR 3 - 5 YEARS
################################################################################################
5 - 12 YEARS: FREE, Headband, Beanie, Ear Flap Hat - COPYRIGHT: Emi Harrington
1. Chain 54, slip stitch to join being careful not to twist the chain.
2. Chain 2, double crochet in each stitch around, slip stitch to join.
3. Chain 1 and turn, single crochet in the same stitch, *double crochet in the next stitch, single crochet in the
next stitch, repeat from * around, slip stitch to join, ending with a double crochet, slip stitch to join in the first
single crochet stitch.
4. Chain 2 and turn, single crochet in the next stitch, double crochet in the next stitch, repeat from * around, ending
with a single crochet, slip stitch to join in the top of the first chain 2.
5. Repeat step 3 and 4.
 6. Chain 2 and turn, double crochet in each stitch around, slip stitch to join.
If making a headband, fasten off, weave yarn ends into the finished work.
 7. Repeat step 3 and 4 until the work measures 6 inches.
Then work in a spiral: *single crochet in the next 3 stitches, skip the next
stitch, repeat from * until the top of the hat
Is almost closed. Fasten off, thread the yarn end into a needle, weave
through the last row of stitches, pull to close
the top of the hat. Weave all yarn ends into the finished work.
Fold the hat so the yarn end from the foundation chain is the back of the hat.
Count 6 stitches toward the front, attach yarn in the next stitch, single crochet in the same stitch, and in the next 11 stitches toward the front of the hat.
*Chain 1 and turn, single crochet in each stitch across the 12 stitches, repeat from * for 6 more rows.
Decrease for the end of the ear flap:
*Chain 1 and turn, skip the first stitch, single crochet across the row, skipping the 2nd to last stitch, single crochet in the last stitch. repeat from * until there is only one stitch remaining. Add another strand of yarn, and crochet the tie, with as many stitches as desired. Fasten off.
Make the opposite ear flap: Attach yarn in the matching stitch on the opposite side of the hat, and follow the above instructions to work the opposite ear flap. Weave all yarn ends into the finished work.
END OF PATTERN FOR 5 - 12 YEARS
##############################################################################################
12 - 16 YEARS: FREE, Headband, Beanie, Ear Flap Hat - COPYRIGHT: Emi Harrington
1. Chain 56, slip stitch to join being careful not to twist the chain.
2. Chain 2, double crochet in each stitch around, slip stitch to join.
3. Chain 1 and turn, single crochet in the same stitch, *double crochet in the next stitch, single crochet in the
next stitch, repeat from * around, slip stitch to join, ending with a double crochet, slip stitch to join in the first
single crochet stitch.
4. Chain 2 and turn, single crochet in the next stitch, double crochet in the next stitch, repeat from * around, ending
with a single crochet, slip stitch to join in the top of the first chain 2.
5. Repeat step 3 and 4.
 6. Chain 2 and turn, double crochet in each stitch around, slip stitch to join.
If making a headband, fasten off, weave yarn ends into the finished work.
7. Repeat step 3 and 4 until the work measures 6.5 inches.
Then work in a spiral: *single crochet in the next 3 stitches, skip the next stitch, repeat from * until the top of the hat
 Is almost closed. Fasten off, thread the yarn end into a needle, weave
through the last row of stitches, pull to close
the top of the hat. Weave all yarn ends into the finished work.
CONTINUE TO MAKE AN EAR FLAP HAT: Video demo here: https://youtu.be/AHIN8MhluNg
Fold the hat so the yarn end from the foundation chain is the back of the hat.
Count 6 stitches toward the front, attach yarn in the next stitch, single crochet in the same stitch, and in the next 12 stitches toward the front of the hat.
*Chain 1 and turn, single crochet in each stitch across the 13 stitches, repeat from * for 6 more rows.
Decrease for the end of the ear flap:
*Chain 1 and turn, skip the first stitch, single crochet across the row, skipping the 2nd to last stitch, single crochet in the last stitch. repeat from * until there is only one stitch remaining. Add another strand of yarn, and crochet the tie, with as many stitches as desired. Fasten off.
Make the opposite ear flap: Attach yarn in the matching stitch on the opposite side of the hat, and follow the above instructions to work the opposite ear flap. Weave all yarn ends into the finished work.
END OF PATTERN FOR 12 - 16 YEARS
###############################################################################################
ADULT: FREE, Headband, Beanie, Ear Flap Hat - COPYRIGHT: Emi Harrington
1. Chain 60, slip stitch to join being careful not to twist the chain.
2. Chain 2, double crochet in each stitch around, slip stitch to join.
3. Chain 1 and turn, single crochet in the same stitch, *double crochet in the next stitch, single crochet in the
next stitch, repeat from * around, slip stitch to join, ending with a double crochet, slip stitch to join in the first
single crochet stitch.
4. Chain 2 and turn, single crochet in the next stitch, double crochet in the next stitch, repeat from * around, ending
 with a single crochet, slip stitch to join in the top of the first chain 2.
5. Repeat step 3 and 4.
6. Chain 2 and turn, double crochet in each stitch around, slip stitch to join.
If making a headband, fasten off, weave yarn ends into the finished
work.
7. Repeat step 3 and 4 until the work measures 7inches.
 Then work in a spiral: *single crochet in the next 3 stitches, skip the next stitch,
repeat from * until the top of the hat
Is almost closed. Fasten off, thread the yarn end into a needle, weave
through the last row of stitches, pull to close
the top of the hat. Weave all yarn ends into the finished work.
Fold the hat so the yarn end from the foundation chain is the back of the hat.
Count 7stitches toward the front, attach yarn in the next stitch, single crochet in the same stitch, and in the next 13 stitches toward the front of the hat.
*Chain 1 and turn, single crochet in each stitch across the 14 stitches, repeat from * for 8 more rows.
Decrease for the end of the ear flap:
*Chain 1 and turn, skip the first stitch, single crochet across the row, skipping the 2nd to last stitch, single crochet in the last stitch. repeat from * until there is only one stitch remaining. Add another strand of yarn, and crochet the tie, with as many stitches as desired. Fasten off.
Make the opposite ear flap: Attach yarn in the matching stitch on the opposite side of the hat, and follow the above instructions to work the opposite ear flap. Weave all yarn ends into the finished work.
END OF PATTERN FOR ADULT

You may also be interested in:
UNISEX SLOUCHY HAT
SWEET BABY HAT
 BABY THUMBLESS MITTENS


 MATERIALS:
Worsted weight yarn
( Age 6 to Adult S: 1 skein Red Heart Super Saver,400 yds;
L: 2 skeins Red Heart Super Saver; XL= 3 skeins Red
Heart Super Saver (1100 yds)
9 mm crochet hook, (US M or N)
Yarn needle
MATERIALS:
Worsted weight yarn
( Age 6 to Adult S: 1 skein Red Heart Super Saver,400 yds;
L: 2 skeins Red Heart Super Saver; XL= 3 skeins Red
Heart Super Saver (1100 yds)
9 mm crochet hook, (US M or N)
Yarn needle Chain 3 and turn, *triple crochet in each stitch up to the next chain 2 space, in the chain 2 space
make: 2 triple crochet, chain 2, 2 triple crochet.
Repeat from * 3 more times, then triple
crochet in each remaining stitch.
4. ALL SIZES:
Chain 3 and turn, *triple crochet in each stitch up to the next chain 2 space, in the chain 2 space
make: 2 triple crochet, chain 2, 2 triple crochet.
Repeat from * 3 more times, then triple
crochet in each remaining stitch.
4. ALL SIZES: