Menu

Pages

Friday, 24 May 2019

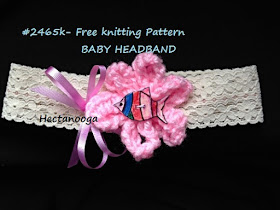
FREE KNITTING PATTERN- BABY HEADBAND #2465k

#2465k- BABY HEADBAND
Copyright © 2019,  Emi Harrington (Do not give away or sell this pattern, copyright protected.)  .This pattern may be printed for your personal use only. You may not in any form, reproduce, transmit, give away or distribute this pattern, including but not limited to images, diagrams and text, through any venue, including photocopying, other electrical or mechanical means, recording, or any other information storage and or retrieval system. (Copyright infringement, even without monetary gain, is punishable by up to five years in federal prison and a fine of $250,000). Permission is granted to sell your finished garments. 
If you have questions about this pattern, you may email me at: mehartgallery@gmail.com 


You can find me here:

HOW TO SOFTEN STIFF YARN:

HOW TO:

MY FREE VIDEO TUTORIALS ON YOUTUBE:http://www.youtube.com/user/Hectanooga1


MATERIALS:
Worsted weight yarn (or 2 strands of double knitting)
6 mm knitting needles
Button
Yarn needle
1/4 inch ribbon  (18 inches)
1 inch lingerie elastic (14 inches)


INSTRUCTIONS:
Block the finished flower by lightly spraying with water, place flat on a towel, arrange into shape, allow to dry undisturbed.

My main focus with designing is to produce a pattern that requires the least amount of instructions, for ease of construction.You can find ALL my patterns on Ravelry: https://www.ravelry.com/designers/emi-harrington  Including over 380 FREE patterns.


1.  FLOWER:  
Cast on 60 stitches, knit across the row casting off each stitch after it is worked.  Leave a long yarn end, thread  it into a yarn needle, weave through every 10th stitch, pull to gather up and form loopy petals, wrap yarn around the center a few times, tie the yarn ends together on the back.   Arrange petals evenly, blocking is recommended.
Sew a button in the center.

Assembly:
Fold 13 inch long length of stretchy lingerie elastic into a tube, sew the 2 ends together.
Attach flower over the sewn join.  Form a bow with 1/4 inch elastic, sew onto the headband.  


CLICK HERE TO


$7.50 for 50 buttons:
BUTTERFLIES BUTTONS

Thursday, 23 May 2019

FREE KNITTING PATTERN, KNIT EARRINGS, #2464K


2464K-KNIT EARRINGS
Copyright © 2019,  Emi Harrington (Do not give away or sell this pattern, copyright protected.)  .This pattern may be printed for your personal use only. You may not in any form, reproduce, transmit, give away or distribute this pattern, including but not limited to images, diagrams and text, through any venue, including photocopying, other electrical or mechanical means, recording, or any other information storage and or retrieval system. (Copyright infringement, even without monetary gain, is punishable by up to five years in federal prison and a fine of $250,000). Permission is granted to sell your finished garments. 
If you have questions about this pattern, you may email me at: mehartgallery@gmail.com 


You can find me here:

HOW TO SOFTEN STIFF YARN:


HOW TO:

MY FREE VIDEO TUTORIALS ON YOUTUBE:http://www.youtube.com/user/Hectanooga1


MATERIALS:
Worsted weight yarn, or 100% cotton worsted
4 mm knitting needles
Yarn needle


INSTRUCTIONS:
Block the finished garment by lightly spraying with water, place flat on a towel, arrange into shape, pat down lightly to flatten the stitches, allow to dry undisturbed.

My main focus with designing is to produce a pattern that requires the least amount of instructions, for ease of construction.You can find ALL my patterns on Ravelry: https://www.ravelry.com/designers/emi-harrington  Including over 380 FREE patterns.

RED HEART OMBRE YARN


1.  Light blue hoops:  Cast on 10 stitches, (or more for larger hoops), knit 2 stitches in each stitch (20). Knit across the row, casting off each stitch after it is worked.Tie the yarn ends into a knot to connect into a circle, weave ends into the finished work.  Attach ear wires. (For more movement, attach a jump ring to the yarn hoop before adding to the ear wires.)


2.  DARK BLUE OVALS:  Chunky yarn, 0R 2 strands of ww yarn, same instructions as light blue hoops.  Shape into ovals before blocking.


3.  RED RECTANGLES: Cast on 7 stitches, (or more for longer earrings), knit across the row casting off each stitch after it is worked.Tie the 2 yarn ends into a knot weave ends into the finished work.  Attach buttons or charms.  Attach ear wires.
If desired, add beads to any of the earrings. (Acrylic yarn was used for the red, 100% cotton worsted for pastel colors shown below.)


WOODEN BUTTONS
$6.99 FOR 100


Monday, 20 May 2019

free knitting pattern MOHAIR KNIT FLOWER

Free knit mohair flower

Copyright © 2019,  Emi Harrington

 (Do not give away or sell this pattern, copyright protected.)  .

This pattern may be printed for your personal use only. You may not in any form, reproduce, transmit, give away or distribute this pattern, including but not limited to images, diagrams and text, through any venue, including photocopying, other electrical or mechanical means, recording, or any other information storage and or retrieval system. (Copyright infringement, even without monetary gain, is punishable by up to five years in federal prison and a fine of $250,000). Permission is granted to sell your finished garments. 


If you have questions about this pattern, you may email me at: mehartgallery@gmail.com 

 You can find me here:

HOW TO SOFTEN STIFF YARN:

HOW TO:

MY FREE VIDEO TUTORIALS ON YOUTUBE:http://www.youtube.com/user/Hectanooga1

This site contains affilite links, which do not cost you any more than a regular purchase,
but the company may pay a small commission to the owner of this site.


Buy Red Heart Yarn here:


100 WOODEN BUTTONS for all your crochet, knitting, and sewing needs!


MATERIALS: Mohair yarn, (OR ANY FINE YARN)worked 2 strands , 
8 mm knitting needles, 
yarn needle, 
beads or button

INSTRUCTIONS:
Block the finished garment by lightly spraying with water, place flat on a towel, arrange into shape, pat down lightly to flatten the stitches, allow to dry undisturbed.

My main focus with designing is to produce a pattern that requires the least amount of instructions, for ease of construction.You can find ALL my patterns on Ravelry: https://www.ravelry.com/designers/emi-harrington  Including over 380 FREE patterns.


1.  Cast on 60 stitches, Cast off, leave a 12 inch long yarn end, thread it into a needle, pass through every 10th stitch, pull to gather up, wrap yarn around the center several times, take several stitches to secure, sew beads or a button in the center.

Saturday, 18 May 2019

FREE KNITTING PATTERN, Sunflower or Brown-Eyed Susan

2456- KNIT BROWN-EYED SUSAN OR SUNFLOWER
Copyright © 2019,  Emi Harrington (Do not give away or sell this pattern, copyright protected.)  .This pattern may be printed for your personal use only. You may not in any form, reproduce, transmit, give away or distribute this pattern, including but not limited to images, diagrams and text, through any venue, including photocopying, other electrical or mechanical means, recording, or any other information storage and or retrieval system. (Copyright infringement, even without monetary gain, is punishable by up to five years in federal prison and a fine of $250,000). Permission is granted to sell your finished garments. 
If you have questions about this pattern, you may email me at: mehartgallery@gmail.com 


You can find me here:


HOW TO:


MATERIALS:
Worsted weight yarn, worked 2 strands **OR** 1 strand chunky yarn
 (25 yds ww yellow,     4 yds brown ww.,        Green 3.5 yds ww per leaf)
6 mm knitting needles, (US 10)
Yarn needle

INSTRUCTIONS: Use larger or smaller yarn and needles to change size of flower.
Block the finished flower by lightly spraying with water, place flat on a towel, arrange into shape, pat down lightly to flatten the stitches, allow to dry undisturbed.
Or steam from above with a steam iron, arrange into place, allow to set up.
My main focus with designing is to produce a pattern that requires the least amount of instructions, for ease of construction.You can find ALL my patterns on Ravelry: https://www.ravelry.com/designers/emi-harrington  Including over 380 FREE patterns.


1.   Yellow petals:  Make 2
Working with 6 mm needles, and 2 strands of ww yarn (or 1 strand chunky yarn)
cast on 6 stitches.
2.  Knit the first 5 stitches, casting off each one after it is knit.  Knit the last stitch.
(You will be knitting 5, casting off 4)
3.  (You will have 2 stitches on the needle),  cast on 4  extra stitches.  (Use any cast on method, I
simply looped over my thumb, and slipped the stitch onto the needle.)
4.  Repeat step 2 and 3 until  11 petals are formed, cast off.  Thread the yarn end into a
needle, and attach the first and last petals to form a circle. Block (I used a steam iron).  Stack
the 2 layers and sew together with the same yarn.. **NOTE, the beginning yarn end will be at
the tip of the first petal, weave it through the petal. Also, the first petal will be slightly
wider than the others, place them away from each other so they don’t end up at the same
location.  


5. Brown center: Cast on 20 stitches, knit across the row, casting off each stitch after it is
knit. Thread the yarn end into a needle, weave the needle through the cast on row of stitches,   
pull to gather up into a circle, sew the 2 ends together, and  attach by sewing  
in the center of the petals.


LEAVES:  Cast on 6 stitches, knit every row for 7 rows.  
Knit 2 stitches together across the row (3),
Knit the first 2 stitches together, knit the last stitch,
knit the remaining 2 stitches together, cast off.
Sew onto the back of the flower.


 A TO Z CROCHET BOOK